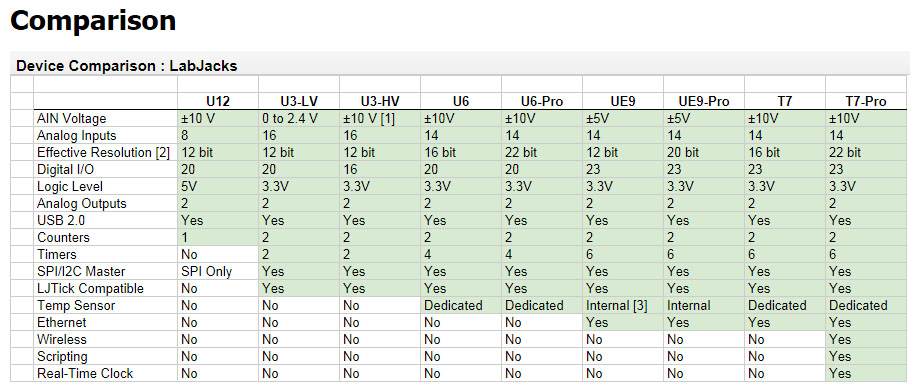
Labjack 제품 비교표 출처
http://labjack.com/products/comparison
Quick Start Guide
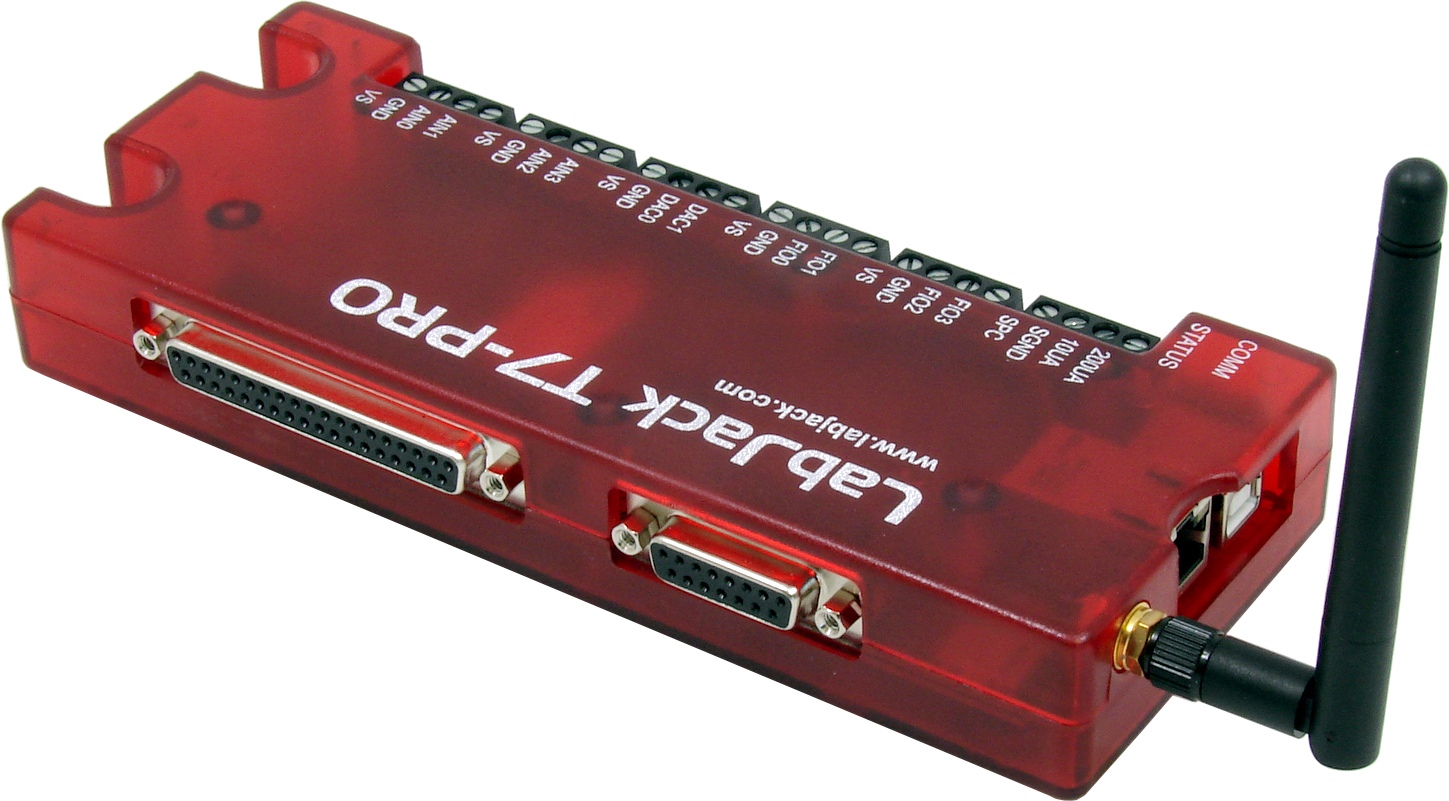
1. T7/T7-Pro 를 컴퓨터 USB 컨넥터에 연결.

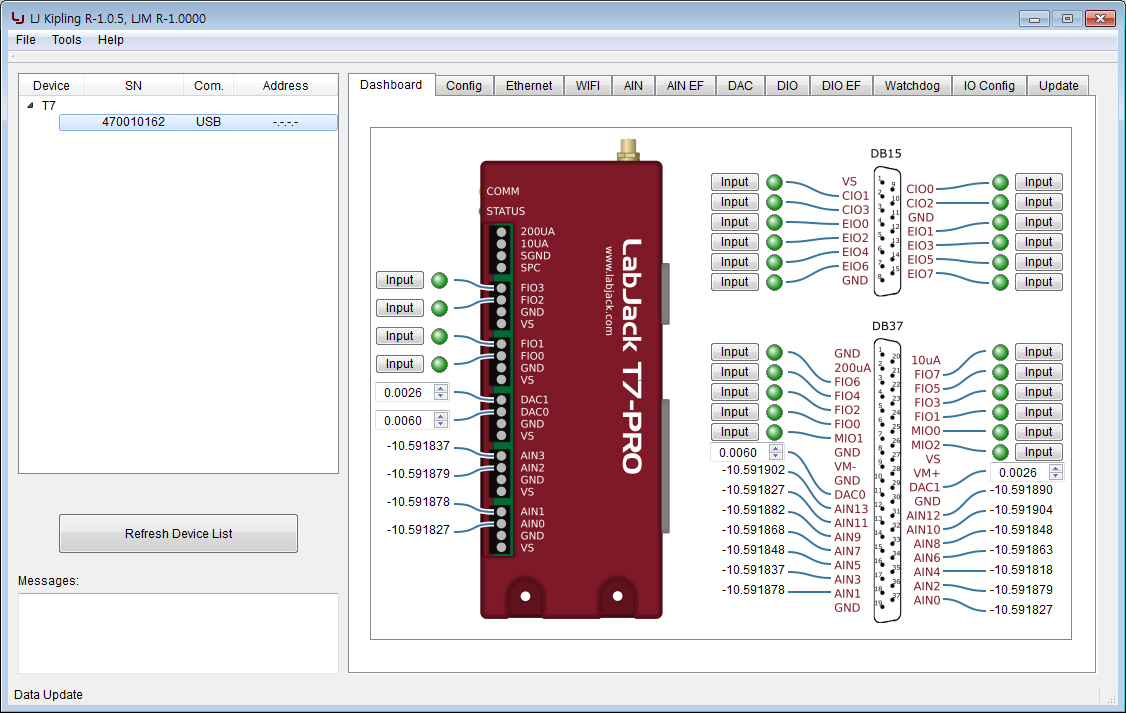
2. Kipling 프로그램 실행 (시작 -> 프로그램 -> LabJack -> Kipling), 장치 S/N 를 확인. 프로그램이 설치 되지 않았다면 http://labjack.com/support/software 에서 프로그램 다운로드 후 설치

3. 프로그램에서 Config 탭을 선택

4. POWER_ETHERNET 과 POWER_WIFI 를 1 로 설정. 설정 값이 0이면 더블클릭해서 1로 변경. POWER 가 0 에서 1로 변경되면 모듈이 활성화 됩니다. 주의: 이 레지스터는 전류 설정을 제어합니다. Power-up 설정을 제어하기위해서는 default 레지스터를 사용하세요.

Ethernet 설정
5. Ethernet 탭 클릭

6. 새로운 기본 IP 주소, subnet, gateway, 등등의 값을 더블 클릭 후 입력합니다. 현재 값이 일기 전용 "R" 의 경우 변경은 불가능 합니다. 읽기 및 쓰기 "RW" 타입만 변경할 수 있습니다. 새로운 설정은 장치의 다음 파워 사이클에 효과를 가질 것 입니다. (일반적인 경우 전원을 껐다가 켜면 적용됨.)

DHCP 가 enabled 이면, 기본 IP 가 사용되어질 수 없습니다. 그래서 정적 IP 가 중요하면 DHCP 가 disabled 인지 확인해야만 합니다.
WiFi 설정
7. WiFi 탭 클릭 (T7 Pro 에만 지원됨)

8. WiFi 연결에 필요한 설정을 더블클릭하여 값을 입력. 전형적으로 DHCP=1=On 그리고 정확한 SSID 그리고 비밀번호 (이 두가지는 모두 매우 중요함). DHCP=0=Off 이면, 관련된 IP 설정이 필요함. 다양한 _DEFAULT 레지스터를 사용할 수 있습니다, 읽기전용 "R" 의 경우는 현재 값을 변경할 수 없습니다. WIFI_APPLY_SETTINGS 값을 1 로 해야만 WiFi 모듈에 값을 보내고 저장할 수 있습니다.

먼저 (1) SSID 를 입력, 그리고 나서 (2) password 를 입력, 다음에 (3) WIFI_APPLY_SETTINGS 를 1 로 설정. 새로운 설정이 WiFi 모듈의 PIC32 프로세서에 전송될 것입니다. 그리고 모듈은 WiFi_STATUS에 나타난 일련의 상태 코드를 가지고 네트워크에 연결하려고 시도할 것입니다. 상태 코드의 완벽한 목록은 T7 datasheet 에 있습니다. 하지만 일반적인 것은 아래 목록을 참조 하시기 바랍니다:
2900 -> Associated
2902 -> Association failed
2903 -> Unpowered
2904 -> Booting Up
2906 -> Applying Settings
2907 -> DHCP Started
Once WiFi is associated, it will appear as a possible connection in Kipling. Press "Refresh Device List" to see all active connections.
Troubleshooting tips for WiFi joining and WiFi communication in general:
- Don't see a listing for the WiFi connection in Kipling? When you use the USB or Ethernet listing and go to the WiFi tab do you see that the WiFi status registers look good (e.g. WIFI_IP=Good, WIFI_STATUS=2900)? Most likely the WiFi connection is good, but due to some unique details of your network the search algorithms in the LJM library can't find it. Try pinging the device. Try opening the device with the WiFi IP address specified for Identifier (e.g. for LJLogM edit the file LJLogM_open.cfg).
- Weak connection? Typical values for WIFI_RSSI are -40 for very good, and -75 for very weak. We have found that an RSSI of -40 to -70 provides a good connection. Note that the T7 microcontroller only gets a new RSSI value from the WiFi module when WiFi communication occurs.
- Keep seeing 2902 meaning "association failed"? SSID and password are both case-sensitive. Re-enter both and write a 1 to apply settings. Use a smart phone or Laptop to confirm the exact SSID name including capitalization.
- Check the "Updates" section of the T7 Support Homepage and make sure you have the current versions of everything. The current version of WiFi firmware is 3.12.
- Do you only have problems when there are multiple T7 related applications running at the same time (e.g. Kipling and LJLogM), perhaps on different computers on your network?
- Use LJLogM to monitor WIFI_STATUS, WIFI_RSSI and VS (e.g. jumper VS to AIN0). Scale STATUS by /1000 and RSSI by /-10 so you can look at all 3 signals on the chart. Log a file to send to support@labjack.com. Any different if you connect LJLogM by USB or WiFi? You can edit ljlogud_open.cfg to force LJLogM to use a particular connection type.
- Update your access point with the latest firmware available from the manufacturer. It is very common for this to cause substantial improvement in the quality of a WiFi network.
- What type of encryption is the network set to? WPA2-PSK is the most common, newest, and seems to work the best.
- Use another device with WiFi to do a site survey of all WiFi networks your area. This will show you what channels the different networks are using so you can make sure your network is using the best (clearest) channel. There are free apps for Android phones to do this, and also options for Linux/Mac/Windows.
- Use Wireshark to get a capture of your network traffic while the problem is occurring, and send that capture to support@labjack.com.
연결
보통 전원은 USB 허브에 220V 아답터를 이용해서 연결할 수 있습니다. 아래 이미지는 컴퓨터 없이 전원 공급하는 예입니다.